*The FastPass service has been retired. The Disney Genie+ and Lightning Lane will be the new service available to bypass the standby queue for select attractions.
 |
| Image courtesy Disney Parks Blog |
FastPass+ enhances the previous FastPass system and takes it to a whole new level. Before, FastPass was a tool to help guests avoid standing in lines for certain attractions throughout the day, by issuing a paper pass with a return time equal to the amount of time you would have stood in line with the current wait time. Essentially, it held your place in line, allowing you to go shop, eat, or experience another attraction. It was a great perk, and when utilized correctly, was a great way to maximize your park time.
FastPass+ works similarly, but adds the convenience of pre-selecting 3 experiences per day before you even arrive at a Disney park. Gone are the days of crossing back and forth across the park to gather paper passes, and then return during the designated window. No more worrying about whether you'll make it to your favorite ride or show. With FastPass+, you'll schedule 3 selections ahead of time (with the ability to choose more after you use your initial 3 selections in the park). With the new technology also comes the ability to offer FastPass+ at more locations than before. Along with attractions and shows, you can now use FastPass+ at many character locations, as well as night time entertainment.
HOW TO USE FASTPASS+
Because this is a paperless system, you have the ability to schedule your FastPass+ selections at home before you go, as well as in the parks. Everything is controlled in your My Disney Experience account, which you can access on your home computer, or on any tablet and mobile device via the free app. In the park, you can use your phone/mobile device, or go to any of the kiosks with the FastPass+ logo (using your MagicBand).
Disney is also continually updating and improving the functionality of My Disney Experience. Since it was implemented in 2013, the FastPass+ portion of the website has undergone many changes - always making the experience easier.
Video courtesy of the Disney Parks Blog
Having trouble viewing the video? Click here to watch on YouTube.
 STEP 1 - Begin
The window to select FastPasses will open at 60 days for guests staying at a Disney resort, and 30
days for all other guests. As soon as possible, create a My Disney Experience account, and link your package and/or tickets. You'll be asked to specify who is in your party, so the tickets are properly assigned to the correct guests.
When your window opens, you'll log into your My Disney Experience account, and select Get FastPass+ from the drop down menu.
STEP 2 - Select Guests

You can make FastPass+ selections for all the guests who are traveling with you. Even if you aren't staying in the same room, you can connect as Friends and Family. This makes it easy for large groups who want to make plans together. FastPass+ is very flexible; you may make plans as a group or individually, or in any combination you'd like. You can also start all together, and then go back to edit and tweak things separately. To begin, simply select whichever members of your party that you'd like to include in that day's FastPass+ plans.
STEP 2 - Choose a Date & Park
 You'll make your selections day by day. You can make FastPass+ selections for as many days that you have valid park tickets. Start by selecting the first day you'd like to plan during your visit, and then select the park.
For your convenience, park hours are listed under each option. Check the park you'd like to visit, and click Next.

STEP 4 - Make Your Selection
This is where the fun begins. You can select your first FastPass+ experience. You can Filter by Time for FastPass+ selections available in the Morning, Afternoon, Evening or search for a specific time using the Select a Time drop down option.
At Epcot, Disney's Hollywood Studios and Disney's Animal Kingdom Park, the FastPass+ options are grouped into two groups: tier 1 and tier 2. At each of these parks, you will need to choose one option from tier 1, and 2 options from tier 2. At the Magic Kingdom you'll simply choose 3 options, as they are not tiered (as of now).

If no FastPasses are available for an attraction, it will be listed as Currently Unavailable, and you will not be able to select it. The sooner you make your selections, the better your chances of getting exactly what you want, when you want.
Don't see the time you are looking for? Click on the View Details and More Times link to see additional times that are available.
Once on that screen, you can see all available FastPass+ Times plus the Thrill Type, any height requirements and suggested Ages.
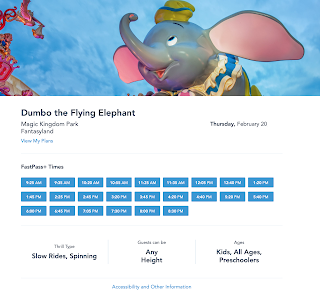 Select the Time that best works for your
schedule.
Once on that screen, you can see all available FastPass+ Times plus the Thrill Type, any height requirements and suggested Ages.
 Select the Time that best works for your
 schedule.

STEP 5 - Confirm Your Selection

 After you have made a FastPass+ selection, you can change the time, experience, FastPass+ party or cancel your selection.
 To change the time, you can click on the drop-down menu and pick a time that works better for you or you can select one of the three times
provided. Click on the preferred time and then click Confirm on the next screen to finalize your change.

You can also Cancel a FastPass+ selection and start over from the beginning.
 Once you have finished making all your selections, you can see those selections on the FastPass+ and My Plans pages of My Disney Experience. These pages will show you day-by-day which FastPass+ selections you have made. On the My Plans page, you can see your FastPass+ selections along with your resort reservation, dining reservations, and any other experiences you put on your Wish List. All of these pages can be accessed from the drop down menu under the My Disney Experience tab.
 If you would like to go back and update any of your selections at another time, simply click on
Get FastPass+ in Step 1 again. You will be able to select FastPasses on a previously unscheduled day, change your current selections, cancel your selections for a certain day, or copy your existing FastPass+ selections to another member of your party (depending on availability).
That's it! The last and most important step is to enjoy your vacation. You can relax knowing that you are guaranteed a spot at your favorite experiences, yet still have the flexibility to change your schedule on the go.
*This step by step guide was accurate as of its last update on January 31, 2020.
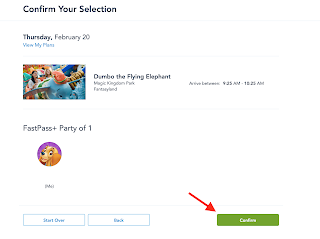
Once you are happy with your selection, click on Confirm to finalize your FastPass+ choice.

STEP 6 - Repeat Step 4
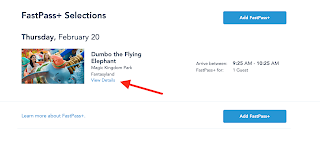
Congratulations, you have scheduled your first FastPass+ selection! Now that you have made your first selection, you can either make another FastPass+ selection for the same day, select a different day or stop making selections.
Congratulations, you have scheduled your first FastPass+ selection! Now that you have made your first selection, you can either make another FastPass+ selection for the same day, select a different day or stop making selections.
You can repeat Step 4 until you have pre-selected 3 FastPass+ selections per day for every day you have a valid park ticket.
STEP 7 - Modifying Your Existing FastPass+ Selections
 After you have made a FastPass+ selection, you can change the time, experience, FastPass+ party or cancel your selection.
To change the time or experience, click on the Modify button.

provided. Click on the preferred time and then click Confirm on the next screen to finalize your change.
Same goes for picking a new experience. Find the new experience you want to select and then pick a time. Click Confirm to finalize the change.
To change your FastPass+ party,
click on Change Party.

You can also Cancel a FastPass+ selection and start over from the beginning.
Once you have selected a new time, experience or FastPass+ party, click on the Confirm button to confirm your change.
STEP 8 - Completion! Viewing Your Selections
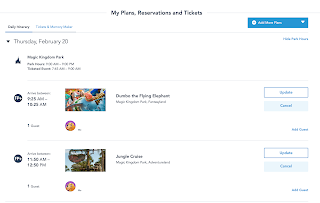
 Once you have finished making all your selections, you can see those selections on the FastPass+ and My Plans pages of My Disney Experience. These pages will show you day-by-day which FastPass+ selections you have made. On the My Plans page, you can see your FastPass+ selections along with your resort reservation, dining reservations, and any other experiences you put on your Wish List. All of these pages can be accessed from the drop down menu under the My Disney Experience tab.
STEP 9 - Managing Your Selections
 If you would like to go back and update any of your selections at another time, simply click on
 Get FastPass+ in Step 1 again. You will be able to select FastPasses on a previously unscheduled day, change your current selections, cancel your selections for a certain day, or copy your existing FastPass+ selections to another member of your party (depending on availability).
That's it! The last and most important step is to enjoy your vacation. You can relax knowing that you are guaranteed a spot at your favorite experiences, yet still have the flexibility to change your schedule on the go.
*This step by step guide was accurate as of its last update on January 31, 2020.
Comments
Post a Comment